Getting Started in 5 Minutes
- Wilfred van der Deijl
- Richard Olrichs
Follow this short tutorial to setup a project with the ADF XML DataControl so you get a feeling for its basic functionality. Read the rest of the Developer's Guide for more advanced features.
Step-by-step guide
Download Extension
Download the extension for your version of JDeveloper from the Bamboo build. Currently we support JDeveloper 11.1.1.x and 12.1.2.x. No support for JDeveloper 11.1.2.x yet, but this could be added if there is a demand.
Install Extension
Do not extract the downloaded ZIP file but simply install it into JDeveloper. Select Check For Updates from the Help menu.
Then select to Install From Local File and select the ZIP you just downloaded.
Finally finish the wizard and restart JDeveloper.
Start new JDeveloper project
Once JDeveloper is restarted after installing the extension, you are ready to start a blank project. In JDeveloper 11 select New from the File menu. In JDeveloper 12 open the File menu, then New and finally Application. Either way you end up in the New Gallery. We don't need ADF Business Components, so do not select a ADF Fusion Web Application. Just select the most basic application. In JDeveloper 12 this is called a Custom Application while JDeveloper 11 calls this a Generic Application.
Continue the wizard until you end up at the page to configure the one project that will be in your application. You only need to add ADF Page Flow to the selected technologies. This will automatically add all dependent technologies as well.
Finish the wizard to create your sample Application and Project.
Create XML Data Control
Again, click New in the File menu to open the New Gallery panel. This time select the XML Data Control from the Data Controls folder under Business Tier. When using JDeveloper 11, you might need to switch to the All Technologies tab first.
This will open a dialog to configure your XML Data Control. In this tutorial we are going to invoke a demonstration web service we host on the public internet that returns the SOAP/XML payload we need. The XML Data Control offers a number of different providers to get the XML which includes a static (test) file, a JSF EL expression, or you could implement your own provider that needs to somehow fetch the XML. More on that in the Developer's Guide.
For now, just enter the following details:
| Item | Value |
|---|---|
| Name | Whatever you like, for example MyDataControl |
| Package | Whatever you like, for example org.adfemg.sample |
| Runtime Schema | The Data Control always needs a XSD, "promising" what the structure of the XML will be. For our demo specify http://xmldc-sample.appspot.com/HR.xsd |
| Design Schema | No need to specify this. This is only needed for rare cases where JDeveloper needs to fetch the XSD from a different location at design time than WebLogic at runtime |
| Schema Root | This is the XSD Element or ComplexType that we will be working with. In our example specify ListAllDepartmentsResponse as that is the element that our web service will be returning |
| Data Provider | The data provider is responsible for retrieving the XML at runtime. In our example select Web Service. More details on other providers can be found in the Developer's Guide. |
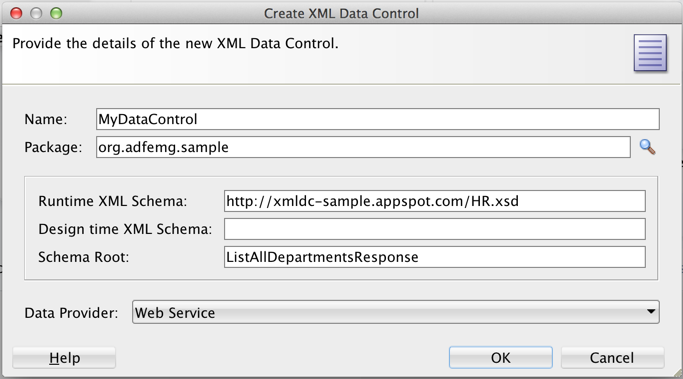
Close the dialog to complete the wizard. The ADF XML Data Control extension has setup your project to use the ADF Binding layer and added the necessary libraries to your project.
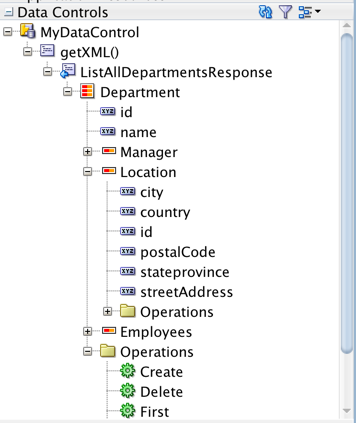
Click the Refresh button in the Data Controls panel to force JDeveloper to reload the data control structures.
That's it! You've just created your first XML Data Control. Expand it to see the entire XML structure that will be returned by the web service data provider.
For the data control to actually work at runtime we still need to tell it a bit more about the web service. The XML Data Control is highly flexible by plugging in different providers. More on that in the full Developer's Guide, but for now we just need to focus on further configuring the web service data provider. All of this is done in the DataControls.dcx file that defines the data controls. In JDeveloper 12 this should already have been opened after creating the data control, but in JDeveloper 11 you have to open this yourself from the Application Sources.
Switch to the source view of the DataControls.dcx editor and make a number of changes:
- Change the
endPointUrlparameter value tohttp://xmldc-sample.appspot.com/HumanResourcesService - Remove the entire
parameterXML element forendPointConnection - You can remove the
soapActionelement as our demo service doesn't need it, but you might need this when invoking other web services. - The requestElement contains the actual SOAP request that needs to be sent to the server. In our example this is extremely simple as we don't need any parameter. Simple replace the
CDATAcontent with<ListAllDepartmentsRequest xmlns="http://adfemg.org/HR"/>
You should end up with the following definition node (under the Source node):
      <definition xmlns="http://adfemg.org/adfm/datacontrol/configuration"
                  schema="http://xmldc-sample.appspot.com/HR.xsd"
                  schema-root="ListAllDepartmentsResponse"
                  dc-operation="getXML">
        <data-provider class="org.adfemg.datacontrol.xml.provider.data.WSDataProvider">
          <parameters>
            <parameter name="endPointUrl" value="http://xmldc-sample.appspot.com/HumanResourcesService"/>
            <parameter name="soapVersion" value="1.1"/>
            <xml-parameter name="requestElement">
              <![CDATA[   <ListAllDepartmentsRequest xmlns="http://adfemg.org/HR"/>   ]]>
            </xml-parameter>
          </parameters>
        </data-provider>
      </definition>
This completes the XML Data Control.
Create Simple Page
Now that you are done with creating the data control all you need to do is create a simple page to see if it really works. Open the Web Content/public_html/WEB-INF/adfc-config.xml file. Then drag a View activity from the component palette to the editor.
Double-click the view activity to edit its page and accept all defaults in the dialog to create this page.
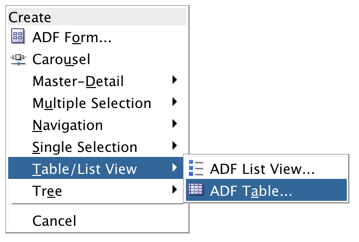
Once in the JSF page editor, simply drag-and-drop the Department collection from the Data Controls panel to the page editor:
When asked what type of component to create, select an ADF Table. In JDeveloper 11 select ADF Read Only Table for simplicity. Obviously you can also edit XML data with the XML data control, but let's keep things as simple as possible for now.
A dialog appears which columns should be used in the table. You can remove most of them for simplicity or leave them if you like. In JDeveloper 12c this is also the place where you can opt for a read-only table:
This completes building your first ADF XML DataControl application.
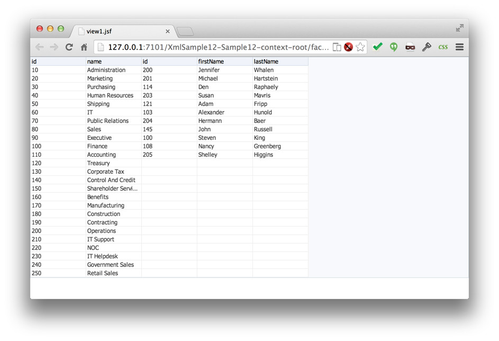
Run the Page
All you have to do now is run the page and enjoy. The very first time you run this sample it might take a while as the Google App Engine instance hosting our web service is shutdown after a period of inactivity. Google will start a fresh new Java container the first time you invoke our demo web service.
Next Steps...
This was just a very simple example. Hopefully you did get a feeling for how simple it is to work with the XML Data Control. But there is so much more to discover. Read the rest of the Developer's Guide to get an idea of what you can do with the data control. You've now seen the web service data provider, but there are other types of data providers as well. Other providers exist which act as sort of plugins to the data control offering things like XSL transformation, Java to XML type mapping, caching, and more. You can also add your own providers or customise the data control elements with Java annotations.